Dynamic Mosaic -
Help Dynamic Mosaic -
Help |
Dynamic Mosaic -
Help
My first dynamic show
This
chapter explains how to start an event from scratch. This is done is 5 easy
steps. It is assumed that the source files
and
the commercial files are already selected and are available in their respective folders. It is
also assumed that the picture library is available and has sufficient
pictures. In this tutorial we use the pre-installed library (with small tiles: just 120x120 pixels
each picture).
Step 1:
Make the initial mosaic. Start the application. Select
the 'Sources' tab and double click on the 4:3 picture
'Dali.jpg' (just an example). This picture is now also shown in the GUI (left
top). Click on the 'Viewer' tab
to get the viewer back in sight. Click on the 'Show
Controls'
button to open the mosaic size
window. Set the values to Then
create an initial mosaic (clicking the 'Initial
Mosaic'
button). After a few seconds the mosaic is
ready. Step 2:
Set the dynamic timers. Use the sliders at the bottom
to set to the following values: You should now see the
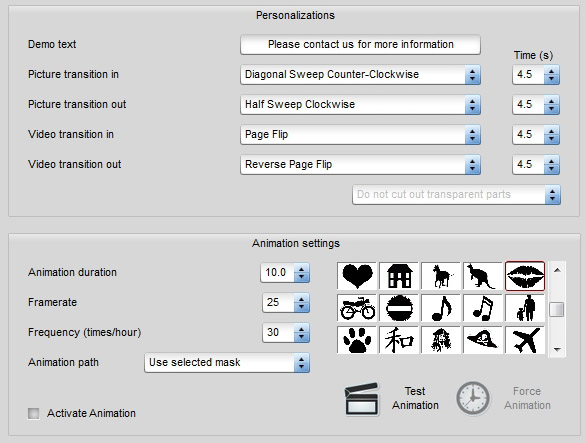
following interface: Step 3: set the animation
values
Close the 'Mosaic settings' window. Select the 'Admin' tab and then open the 'Animation' tab. You can now
select any kind of transition effect you like. We propose to keep the defaults
for now. Make sure you also keep the transition period (4.5 seconds). Then select the animation
effect. We will simply select an unmasked effect: 'Exploding from centre -
Linear'. Set the following timing values: Don't forget to also check the
'Activate animation' box. Now, test the animation by
pressing the 'Test Animation' button. You have to be
quick: after pressing this button you now need to also click on the 'Viewer' tab to see the effect. In done quickly enough you
will now see the animation. You should now see something like this: Step 4: Detach the viewer
Basically this is all that is
required to prepare a dynamics show. The last thing that needs to be do is to
detach the viewer from the interface, and place this on an external monitor. The
show can be run from a single screen system but this is not recommended. The
admin tasks need to be done in sight of the audience. Even in a simple show it
is assumed that the monitor is an external screen. To detach the screen press the
'Detach Viewer' button. The screen will now be
available as a separate window. Drag this window in the second monitor window.
Then use the menu bar commands 'Admin' 'Borderless viewer', followed by
'Admin' Full screen viewer' (or vice versa). The
monitor viewer window is now fully visible, with black edges: the mosaic
can sometimes have a slightly different aspect ratio than the viewer
monitor. Step 5: Start the dynamics
When all
is checked and done as described in steps 1-4 press the 'Start Dynamics' button and enjoy the show. The tiles will
fly into the mosaic, and the choice of tiles is provided by the 'Image list' in the Admin tab 'Images'. When running, over time all the current library
pictures will be used to rebuild the mosaic. And every 15 minutes, after a
commercial interlude, a new source picture is selected
and a new mosaic is made, and the whole tile replacement is started
again.
Quality:
100%
Min Distance: 10
(tiles)
Blend:
20%
Colorize:
40%
Colour engine: random
tiles
Size and amount:
36
Tile aspect ratio:
Landscape 4:3 (same as the source picture)
Normal frame and random
flying path
Accuracy:
80%
Blend, Static and Dynamic:
each 4.0 seconds
Pause: 4.0 and 7.0
seconds
Static and Picture: each
8.0 seconds
Interlude: 10
minutes.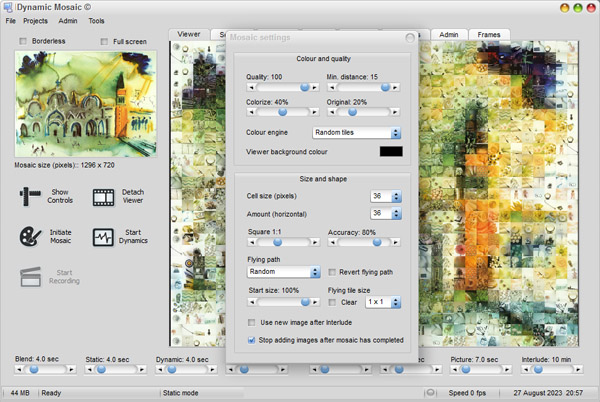
Animation time: 10 seconds
(or 5 seconds to the 'explosion', and 5 seconds back to the
mosaic)
Frame
rate: 18 fps for i5
or 12 fps for i3 systems
Frequency: 12 times per hour (every 5 minutes)
You
should now see this interface: